Friday, December 19, 2008

Hidden Text in Word

This post explains how to collapse multiple sections in a word doc.


There may come a time when you need to collapse sections of a word doc based on a checkbox. The sample form I'm using looks like this:
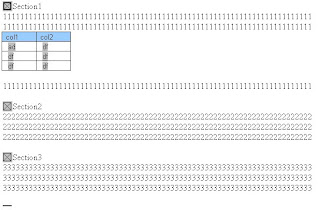


To create this form:

1. Create a new word doc and add a checkbox.

2. Type some text under the text box.

3. Select the area you wish to hide and add a bookmark: Insert->Bookmark. The Bookmark dialog will appear. Type "Section 1" as bookmark name and close.

4. Repeat the process two more times.


What we've done is create "Enclosing Bookmarks" around some text. There are actually two types of bookmarks. These are:

1) Placeholder Bookmarks which look like a beam.

2) Enclosing Bookmarks that will show up as graphics.

You can see these book marks by going to Tools->Options->Display Bookmarks.

(Bookmark indicators in Red)

Now for hooking up the checkboxes.
The Checkboxes need to call a function. So, first we have to write the function. The code should look like so:


Public Sub Hideit()

'unprotect the document
If ActiveDocument.ProtectionType <> wdNoProtection Then
ActiveDocument.Unprotect Password:=""
End If

ActiveDocument.ActiveWindow.View.ShowHiddenText = False

'Get the range of the bookmark.
Dim rng As RangeSet rng = ActiveDocument.Bookmarks("Section1").Range

If ActiveDocument.FormFields("Check1").CheckBox.Value = True Then

rng.Font.Hidden = 0
Else
rng.Font.Hidden = 1
End If

ActiveDocument.Protect Type:=wdAllowOnlyFormFields, NoReset:=True

End Sub


Now in the Checkbox, select this function and your
done! Additional Info here: http://word.mvps.org/faqs/MacrosVBA/WorkWithBookmarks.htm

Happy Coding!

Jas
Wednesday, December 03, 2008

Line Ring Selection Algorithm

I'm thinking about adding a tool that will select a ring of lines.
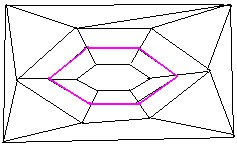
Here is an example of a ring you want to select.


Okay, what I've come up so far is something pretty simple.
1. Copy the target face.
2. Check to see if the selected line is an edge.
3a. Yes, calculate all the edges that are attached to the selected edge and select. END
3b. No, remove all polys that have edges. goto 2.

This image shows how it would work on the example.


I know there are some exceptions. It seems simple enough. I'll let you know how it works.

Happy Coding!
Jas

Thursday, November 13, 2008

Character Modeling II

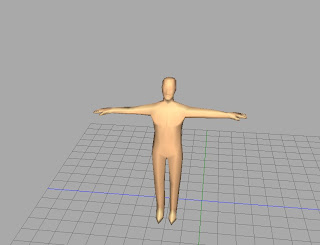
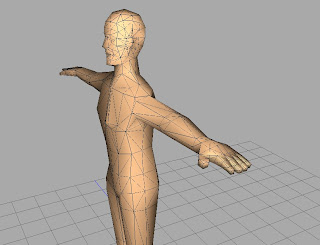
Picking up from the previous post, I've modeled a basic character using a billboard as a guide. See picture:

You can see the bone system residing inside of the character. For the hands I only needed the ability to move the thumb, index, and rest of fingers as a group so I used three bones.

Assigning the geometry to the bones:
In my tool I do this by selecting the desired bone. I select the geometry I want to assign to it and associate the selection tot he bone. In the following image you can see that I have part of the spine selected and I'm assigning verts to the torso.(GREEN=assigned, Yellow=assigned to another bone, BLUE= not assigned at all)

Note: In other tools, you'll be able to do this by some tool automatically, but since I haven't coded that, I alternated the model color to help in the assignment process.

After applying all the geometry to the bones, I created some test animations that ran the character through basic movments. Each joint was a different animation.

As I tested the animations, I would make adjustments to the bone assignments, applying multiple bones to influence the points. This is great in areas like the shoulders, hips, knees, and neck. You'll need to add additional geometry to improve the animations. My character jumped from 1100 polys to over 1500+ polys by the time I was done with this process.

Once the models movement looks acceptable with the test animations you're ready for texturing. (I made the mistake of texturing first and had to do it again later. Not too bad but could have saved time to wait.)

When you're finished texturing your character is ready for producing the real animations.

The picture above shows my gunslinger (Guns aren't textured yet) in his loiter pose. This guy was exported in .x format and loaded quite nicely into a demo app. Total polys (1530).

Note: I used my own editor to do this character. Let me know if you're interested in trying it out. I'm always looking for people who can give me some suggestions and feedback.

Thanks for reading and happy coding!

Jas

Monday, October 06, 2008

Character Modeling


My goal was to create a model with 1000-1500 polygons. These are the steps I followed:

1. First, I drew and scanned a finished character front and side view in standard pose. Take the time to get it as close as possible to the real thing here in pencil.

2. I took the image and billboarded it in my editor for reference and started building geometry with the same general shape.

3. Modeling: I started with a box and scaled it the size of the chest. I then worked down the torso and did the legs. Next, I worked up the neck and did the head. I then extruded out the arms on both sides, placing geometry in the proper joints to allow for animation. Doing the hands takes some time. Basically, extrude out the fingers and play with the vertices.

The head took quite some time. After adding detail to the face and moving things around I kept shrinking the head and had to readjust things at the vertex level. In your tool you probably have a way of using a select box and scaling the selections. I'm missing that tool. Doing the ears were not so bad but I had to make it look the same on both sides of the head.

4. Grouping the polygons. I went through and grouped the polygons. I'm basically associating polygons within region together for the texture mapping stage.

5. Texture mapped all the groups (faces in my editor), and sized them to a 2048 bitmap. Note, this should be done after step 6 next time. because I'll have to do it again if I change any geometry.

6. (Stopped here) Bone support: Start adding the skeleton and working on animations. Most likely in this process there will need to be some tweaking of the geometry to improve joint areas. (This version of my editor has not implement multiple weighted influences on vertices from multiple bones yet. Coming soon.)

7. Once animation is good and a few of the animation sequences are finished, the geometry is stable and the texture can be generated to the model.

8. Add additional animation sequences.

What I learned or ran into during the process:
1. I'm really needing a mirror tool, and a few other essential modeling tools.
2. I don't know how I'm going to do the gun yet. That involved attaching and detaching a bone to the animation. I'm guessing this will be handled in the engine.
3. It was way more work than I thought it would be but I can use this model as a base for later models if it works out.
4. Been playing spore and would like to add additional features to my editor that allow me to modify geometry by using the bones themselves. (Cool!)
5. I'm not sure yet if the movement (up and down, and jump height) should be coded in the animation or when rendering the animation in the engine. I'm guessing that should be handled in the engine.

Would love to hear how this process differed from your experience developing a fully animated model.

Happy 3Ding!

Jason

Monday, September 22, 2008

DirectX Mesh Loading

It's been awhile since my last post. I got a little burned out on meshes after working on the xfile format. I did recently write a little app that lets me load my walking sequence and walk the little "Jake" model around. Here's a video.

This is just a DirectX 8 application with a skinned .x file loaded. I'm going to create a really simple character and start playing with breaking up the animations by lower and upper body as well as moving the head where the camera is pointing. It will support jump, swing, run, walk, back up, sit, and lay. We'll see how it goes. After that I might start working on lighting a little. but, it would be neat to get more than one person moving things. My editor is comign along well. I have a short buglist and then its on to deployment code. If anyone is interested in trying it out let me know in the reply.

Happy Coding!
Jason

Saturday, July 26, 2008

DirectX Animated Character

This one is a fully textured version of my Jake character. It has some smoothing on it as well. Only 828 polygons.


I did notice that the new "DirectX Viewer" has some rendering issues with normals and lighting, but it still works.

Next on the list is loading this file in XNA and blended animations. I'm hoping to walk this guy around in 3rd person.

Happy Coding!
Jason

Saturday, July 12, 2008

Xfile Export Done and completed build 0.07

Yesterday I finally got my xfile exporter to work correctly. It was just a test but it worked! In this video I'm loading an xfile into the DirectX Viewer.
This model is working as designed. My next test will be a more detailed model. If it works I'll texture it as well. Fun Stuff!

Happy Coding!
Jason

Friday, June 27, 2008

Exporting DirectX Files for Animation

There are two approaches to writing DirectX files. The first is to take your geometry and animation data and stuff it into the D3DX Mesh classes and use Saving functionality. The second approach is to skip the D3DX classes and write a file directly that conforms to the .x format specifications.

I chose to write my own. I found the documentation and examples for loading D3DX classes inadequate when writing an exporter. Every book/article(msdn site, 3D Game Programming With DirectX 9.0, Managed DirectX 9 KickStart, etc.) will have a chapter on how a Bone hierarchy works and then it will show you the "Tiny.X" file and how to load it from file and animate it. But, where are the good examples (Managed code) and documentation on how to initialize and use these objects when you have all the data already? There are only a few and most are written in outdated versions. Since I didn't build my model and animation classes on D3DX classes, filling those objects did not appeal to me.

I worked on the format for a few days. I was able to export static meshes quite well. In fact, I had better results with the .x file I wrote then with the one written by the D3DX classes, which I had previously used to export static meshes. The ones from D3DX didn't load well in the newer Mesh Viewer that comes with the DirectX SDK. It only worked in the old one.

Exporting the Animated Meshes has proven more difficult but I am seeing some good results. I've been tinkering with the transformations and I got it really close. With a little time and some files I'll be exporting.

Happy Coding.

Jason

Wednesday, June 18, 2008

DirectX Character Animation II

In this animation I've upgraded the model a little. There is the stand, walk, run, and swing sequence. Here's the video:


I've also fixed the lighting as you can see in this video. The next one will be fully textured I promise!

Happy Coding!

Jason

Tuesday, June 10, 2008

DirectX Character Animation

I've made a little progress on my animation system. I made a test model I like to call Fred and attached him to an animated skeleton. See Video.


I know the character isn't that pretty but the important thing is that his skin isn't flying around the screen and he is performing the cheesy walk sequence. Although I haven't transformed the normals yet so his lighting is really bad. Next step is to fix normals and start working on weighted blends.

Later I'll support .x format so I'm going to take a close look at the "Simple Animation" demo from microsoft and utilize their AnimationController and D3DFrame structure. I did find that DirectX render state does support vertex blending with the D3DRS_VERTEXBLEND flag. You can read about it here:
http://msdn.microsoft.com/en-us/library/bb173463(VS.85).aspx

Happy Coding!
Jas
(Note I'm not DXJas anymore because microsoft stopped supporting MDX and that upset me. Their alternative was to use XNA or roll your own. XNA Rocks though! Don't get me started...) :)

Monday, May 26, 2008

DirectX Skeletal Mesh Cont.

I've been making progress on my animation. So far I can add bones and frames and animate the bones. See this video of my first animation of a hand.

This was using four key frames. My next task will be to clean up the code, and save the bone animation to file for reloading. After that I'll start working on attaching geometry to the skeleton. Woo Hoo! Can you tell I'm having lots of fun?

I'm pretty sure the attached mesh will have issues in certain areas but I'm hoping that within a few weeks I'll have my first animated mesh and shortly after that my first animated .x file. My goal here is to create a walk sequence and load the animated mesh into a demo game engine. I still haven't figured out how I'm going to let the user edit the geometry. That's going to be quite a shift in process flow. Oh well.

Happy Coding!

DXJas

Tuesday, May 06, 2008

DirectX Skeletal System


Now that I'm able to create static meshes, I've begun developing a skeletal system that will allow me to animate them. (See screenshot)

Next, I'll add gizmos to manipulate the bones, including forward and inverse kinematics, and start playing with key frames and animation.

The last stage involves attaching the mesh to the skeleton. In some areas it will be necessary to assign vertices to multiple bones to smooth the animation a little.

I would be happy to here from some of you on what features you feel are essential in a skeletal system. Is path-based movement important or is it easier to create a few key frames? Do you break up your sequences on the mesh for different body parts so they can be combined? For example, the character can play the run sequence AND the eat sequence at the same time?

Fun stuff! I'll probably be working on this area for the rest of the year.

Slightly off the subject, the best character editor that I ever saw was the character creator in City of Villains. Another good one was in the Spore Video created by Will Wright, the maker of Sims.

Happy Coding!

Jas

Monday, March 17, 2008

SQL Reporting Services: Dividing by Zero

You finally finish that report in SQL Reporting Services that you've been slaving over and find that there is a big ugly #Error text in the middle of your data. You can't publish that! But, how do you handle it? Lets cover a few ways of fixing this.

Sample data:


BudgetedSpent% Avail
100050050.00%
0100#ERR


Your first try at protecting from the divide by zero error might be something like writing an expression in the value field like so:
= IIF( Fields!Budgeted.Value=0, 0, Fields!Spent.Value / Fields!Budgeted.Value)


This wouldn't work. Why? the Reporting Services compiler evaluates the results before the IIF. So, the compiler attempted the division by zero before applying the IIF expression. (Thanks Dataman!)

There are a few ways to handle this.

1. Denominator DeColorization
A quick way to avoid this is to write a little expression for the font color that will turn the font to white if the denominator = zero.
= IIF( Fields!budgeted.Value = 0,"White","Black")


2. Denominator De-Demonization.
This is the "Dataman" approach when you REALLY feel the urge to fix the data because otherwise the universe may be out of alignment. :)

= IIF( Fields!Budgeted.Value=0, 0, Fields!Spent.Value / IIF( Fields!Budgeted.Value=0,1,Fields!.Budgeted.Value))


3. Division SafeCode Routine.
This is pretty cool. In Reporting Services, in the Report Parameters there is a tab for Code. You can put in a custom function and call it in your report. The code would be like so:

Public Function SafeDivide(Numerator as Double, Denominator as Double) as Double
If Denominator = 0 then return 0
Return (Numerator / Denominator)
End Function


In your report you would just set the value like so:
>=Code.SafeDivide(Fields!Spent.Value, Fields!Budgeted.Value)


That's all for pesky #Error messages in your code.

Happy Coding!
P.S. Thanks goes to Charley for your input.
Jason
"We are the musicians. We are the dreamers of dreams." - Willy Wonka

Monday, February 11, 2008

Face Texture Mapping


Well, I'm working on version 0.0.6 of my 3D Editor. I'm currently adding a UV Mapping tool and its coming along nicely. When I'm done, it will have a good set of tools for creating textures. No need to export and import into another art tool. I've included a head that I did this weekend. This build has been very stable and few bugs noted. Next will be animation.

If anyone is interested in trying out my beta version of the software, let me know. I will also be adding support for exporting 2D templates for 2D engines as well. 3D is exported in .x format right now. But, it also exports xml if you need to read them into your engine that way.

Happy Coding!
Jas