Friday, October 26, 2012

Indie 3D Project Promotion

RightBytes is sponsoring three 3D projects! If you are part of a small project team or a 3D hobbyist and are interested in software that is easy to use, sign up for a beta copy! Receive the latest version of Artismo for your team as well as exposure on our site.
Some features of Artismo are:
  • Polygon Modeling System.
  • UV Mapping.
  • Layer System for Model Design.
  • Bone Animation System.
  • UV Envelopes for Vertex UV Assignment.
  • Integrated 2D Art program for producing seamless textures and 2D assets.
  • SpriteMaker Plug-in: For exporting 3D animations to 2D sprite animations for 2D engines and mobile support.
Export Formats:
  • .X file (Animated and Static) for DirectX and XNA Projects.
  • STL: 3D Printer Bot files for 3D Printers.

Sunday, October 02, 2011

Artismo on Windows7

Artismo is working on Windows 7. It turned out that I had optimized some of the core code and forgot to update the installer to include the new dll's. So, we're back up and running.

I started another project working on a Content Management System. I should be using this system on the new Artismo Site to start testing the beta. The CMS is written in C# using MVC3.

Happy Coding!
Jason

Saturday, June 18, 2011

.NET Workflow WF4 State Machine Activities

You may have noticed that workflow has changed drastically from WF 3.5 to WF 4.0. You may have also noticed that the state machine activities were not shipped with WF 4.0.

Fortunately, they have been released on Codeplex. So, here is a link to download the update.
Workflow 4.0 from Codeplex as part of a service pack

I've been playing with the new Workflow and let me say I really like it! Good job WF guys at Microsoft!

Happy Coding!
Jason

Saturday, June 11, 2011

WCF, Entity Framework, and LINQ in 15 Minutes

In this tutorial we'll use Entity Framework in VB.NET to create a Data Model from our SQL database. Then, we'll create a WCF Service to fetch a customer using LINQ. Finally, we'll create a Windows Form as a client application to call the WCFService and get back some data.


Prerequisites
-Visual Studio 2010
-Sql Server Express
-Sql Management Studio (Installed with Sql Express)

1. Creating the Database

To create a simple database for this tutorial:
  1. Open Microsoft Sql Server Management Studio.

  2. Right-Click on the databases folder and choose New Database. Name the database "Testeco".

  3. Right-Click on Tables and choose New Table. Create a table with the following columns:


    IDPrimary key, datatype as numeric(18,0) and allow nulls false. Set Identity to true in properties of column.
    LastVarchar(50)
    FirstVarchar(50)


  4. Name the table "Customer" and hit Save. I named mine "tblCustomer" out of habit, but if you usually prefix your database objects (e.g. tbl, vw, sp) you may want to stop doing this because these names now bubble up into the object names in the solution.

  5. Right-click your table and choose "edit top 200 rows" which will bring up an interface to add rows. Insert five test rows, hit Save and your database should be ready.
2. Creating the Solution

Open Visual Studio 2010. Create a new project. Under Project Templates Choose Other Project Types->Visual Studio Solutions: Blank Solution. Name your project "Testeco" and hit OK.

3. Creating the Data Model Project
  1. Right-Click your Testeco Solution and choose Add->New Project.
    Choose the Visual Basic->Class Library and name it "Testeco Data Model" and hit ok.

  2. Delete the Class1.vb file.

  3. Right-Click the new project and choose Add->New Item. From the list select ADO.Net Entity Data Model, and name it "TestecoDataModel" and hit ok.

  4. A dialog box will appear. Select "Generate from Database" and hit next.

  5. The next dialog requires that you specify the database connection. Select new connection. If you're using sqlexpress you will type the name of the database as localhost\SQLExpress. Select the testeco database and hit ok. Save the connection string as "TestecoEntities" and hit next.

  6. To select the database objects, drill down to tables and check the Customer table. Uncheck the option for Pluralize or Singularize generated object names. This option is not working correctly in the current version but is supposed to be fixed on the next service pack. Name the namespace as "TestecoModelContext" and hit finish.


At this point, you have an Entity Framework Data Model of your table. You should see a new file called TestecoDataModel.edmx and a diagram of the data model in the designer. It has generated the classes to handle updating the database with your object changes for you. Now we are ready to use that data in a service.


4. Creating the WCF Service

In this step we will create a web project that will host our WCF Service.
  1. Right-Click the new project and choose Add->New Item.
    Select WCF->WCF Service Application from the options, and name it "WCFTestecoService". Hit OK.


  2. Delete the IService1 and Service1 files as we will be creating new ones.

  3. Select this project, right-click and select Add->New Item and select WCF Service. Name the file "WCFTestecoService" and hit Add. It creates the Data Contract(Interface) and Service which implements the contract.

  4. Open the Data Contract called "IWCFTestecoService". It created a sample function called DoWork which we will replace with a function to fetch a customer from our Data Model. Replace the Sub DoWork function with:


    Function GetCustomer(ByVal id As Integer) As Customer

    The compiler will flag the return type Customer as unknown but we will fix that on the next step.

  5. Right-click on the project and add->Class... and name it Customer. At this point our compiler will be happy about returning a Customer type. But, we need to add two public properties to the class file. Add two properies to the Customer file for Last and First making your class look like this:

    Public Class Customer
    Public PropertyFirst As String
    Public PropertyLast As String

    End Class

    Something to keep in mind here is that this is not the same class as the Customer coming out of the Entity Framework. We are creating a simple wrapper to return from the service.

  6. Open the WCFTestecoService file. There should be a function in there still that says dowork. We need to rewrite this function so that it implements the new constract we created. Just delete the dowork function completly, place your cursor at the end of the line that says: Implements IWCFTestecoService and hit enter. It will reimplement the interface in your class and write the new function GetCustomer.

  7. Now we need to write the function to get the data out of our datamodel. But, we need to add a reference to the data model project. Right-Click on your service project and select Add Reference. A dialog will appear. Make sure the Project tab is active and select TestecoDataModel and hit OK. We have now added the reference to our data model project.

  8. Back to the GetCustomer function, we need to instantiate the datamodel to query against. Add the following to your function:

    Public Function GetCustomer(ByVal id As Integer) As Customer Implements IWCFTestecoService.GetCustomer
    Dim context = New TestecoDataModel.TestecoEntities()

    Dim result = (span class="blue">From cust In context.Customers
    Where cust.id = id
    Select cust).First

    Return New Customer() With {.First = result.First, .Last = result.Last}

    End Function

    When you update your function two things need to be checked. First, it may complain about the context.Customers. If so, remove the .Customers and use intellisense to add the proper table name (yours may be a little different than mine). Next, it will pick up a missing reference. if you click on the error it will tell you you're missing a reference to System.Data.Entity. And if you click it, it will fix it for you. Great tool!(Wishing C# did this..) The code should now compile correctly. But, before we move on let's review this code.

    The context is our datamodel. We are using Linq to query the context for a customer with a matching ID. We are returning a new customer and setting the properties of the object before we send it back.

  9. One last thing to do is to copy the connection string from our app.config file in the EntityFrameWork project into the web.config for our WCFService. Copy the connectionstring tag out and paste into your web.config. Now, our code can properly reach into the configuration for the connection string it will need.

  10. Build the entire solution and make sure it compiles.


5. Creating the Client Application

We will use a windows application to consume the WCF Service and provide an interface to get our data.


  1. Add a new project to your solution and choose type Visual Basic->Windows->Windows Forms Application and name it ClientApp.

  2. Create a simple form that looks like the image above.
    Name the textboxes as txtID,txtFirst, and txtLast.

  3. We need to add a web reference to our WCF Service. We do this by right clicking the project and selecting "Add Service Reference" which will bring up a dialog. Click the Discover button which will find your web project. Click on the little arrow next to TestecoService.svc which will show our service contract under it. Selectit in the left (nothing will appear in the right which is okay) Name it TestecoService.


  4. Double-Click the Go button on your form to go to the gobehind code. We need to write code that will take the data form the txtID.Text, get a result from our service, and load it into our textboxes. The function should look like this:

    Private Sub btnGo_Click(ByVal sender As System.Object, ByVal e As System.EventArgs) Handles btnGo.Click
    Dim svs = New TestecoService.TestecoServiceClient

    Dim cust = svs.GetCustomer(CInt(txtID.Text))

    txtFirst.Text = cust.First

    txtLast.Text = cust.Last

    End Sub

    We first get a reference to a proxy class that was generated when we added the reference. we then call the function and get our data back. That's it.

  5. Set the startup project as your ClientApp project and run the program.
So, in a few minutes we've used the Entity Framework to create a data model, which we accessed using LINQ in our WCFService, that was used in a simple windows application.

Happy coding!
Jason

Wednesday, April 20, 2011

3D Boolean Operations


A Boolean operation is a process of creating a result set from combining two 3D objects. In this case, I'm creating the union of the two objects. See the picture above of the latest output from the algorithm i'm writing.

It has been challenging to say the least. You have to calculate intersection between the objects for both coplanar (flat surface) and nonplanar scenarios. Once this is done you must triangulate the triangles and then sort them and return the solution. I'll post more pics after a few more nights of testing. Fun stuff! Reply if you want me to blog more on the actual algorithms I'm using. I came up with a few interesting techniques for doing this.

Happy Coding!
Jason

Wednesday, December 08, 2010

vs2010 Resx Error Not Valid Win32 Application Workaround

I had a problem today compiling an app on Windows 7 64-Bit that compiled fine on XP 32 bit. It turns out that it is a bug in vs2010. This is the workaround that I used just in case you run into it.

Description
Two things were happening. Both of them were related to the resx file of my main form.
1. Images that were used in ImageList or Toolbars were causing a problem.
2. A Matrix from a class property was being cached in the resources now and causing an error.

Workaround
I reloaded the GUI images for the toolbar buttons to use images imported into the Properties Resources instead of the Form Resource. This seemed to clear up that issue.

Next, I deleted the offending Matrix data out of resx. I also removed where it was setting the class property in the InitializeComponents function. Next, I fixed the class so that the Matrix property was not serializable by the designer. So, I wouldn't have to do this again. This took a piece of metadata above the property to tell it not to set a default value:
[DesignerSerializationVisibility(DesignerSerializationVisibility.Hidden)]
Everything seems to be working after that. I'll try to post the exact error next time I see it.

Happy Coding!
Jason

Tuesday, December 07, 2010

BSP Trees in Modern Game Engines


I first came across BSP when working with the Unreal Engine. We were working in UnrealEd and a level designer was demonstrating how they were using BSP Brushes to make rooms. I thought they looked like plain boxes. And, that’s really all they were until the compile button was pressed and the magic began. Then, those boxes were sliced, diced, lit, packaged, and ready to run.

Now, as I start planning out my level editor, I find myself thinking about those BSP trees. It has been a few years now, and I begin to wonder if they are the right structure to use in my level editor.

A Binary Space Partitioning (BSP) Tree is a structure that subdivides space into smaller sections or sets. It has been used in First Person Shooter (FPS) games to solve a problem with rendering polygons in the correct order. It would provide a method to traverse the structure and draw the polygons from back to front quickly.

But, the need to manually order triangles became less of an issue with the advent of the hardware accelerated Z-buffer. The polygons get pushed onto the GPU to be quickly sorted and processed for rendering.

That doesn't mean that BSP is obsolete. Spatial partitions, such as BSP, quad-tree, and octrees, are essential tools in modern rendering engines. They are used in visibility testing, network optimization, collision, and lighting. They can also be computed during compile time.

There are many discussions on which spatial partition is best. The truth is that they've all got their strengths and weaknesses. Once you've identified the characteristics of your engine, you'll be ready to identify which structure is best for you. But don't rule out the BSP Tree. They are well documented and still used today in modern engines. Especially for First Person Shooters.

Happy Coding!
Jason

Related Links:
http://www.gamedev.net/reference/programming/features/bsptree/bsp.pdf


http://en.wikipedia.org/wiki/Binary_space_partitioning

Saturday, December 04, 2010

XNA Multiplayer Programming


In a previous post I put together a simple multiplayer tank game with GDI+. But, I decided to change to XNA when I hit a limitation with the game sound. What a perfect opportunity to make it 3D!

There are many advantages to using XNA 4.0, especially if you want to play your game on the xbox 360 or Zune. But, keep in mind that if you want to play it on the XBox 360 you will need to purchase a Developers Membership at App Hub

Content Creation
The first task is to create the tank model and turret using Artismo 3D. If you want a copy just let me know by commenting on this page. Or send me your e-mail by using my contact page here.

The tank in Artismo:


In Artismo I can create the models and the artwork in one application. It even does animation for characters. And, supports plug-in architecture to incorporate project-specific processes. For example, a level editor plug-in could be incorporated into the tool to produce the levels for your game.

Tank Movement
Moving around a 3D object is a lot easier than in GDI+. In GDI+ you're only drawing a square bitmap and everything is centered on the upper left corner so you have to move the image up there, rotate it, and put it back. In 3D you have a matrix and XNA provides really simple functions to rotate or translate the object around. If you ever used Managed DirectX for Windows it is very similar code.

User Interface
In the first version I had regular windows textbox controls and buttons. Not in XNA! You'll have to code them or get a GUI library on the internet. They're not that hard to code though. But, the textbox control does take a little work. If you do a few searches on the internet you can find some examples of doing it. The font support was really easy as well.

Client/Server Protocol
On the server side, there were a few changes because I had to send more data now. Instead of just a position point in 2D and a rotation amount, I changed it to send the tank matrix or transform. It is possible to do it with the original data but it was much easier to pass back and forth the exact data I needed instead of trying to derive the matrix from pieces of information.

Sound
Sound was a lot easier! I can play multiple sounds at the same time and XNA even supports stereo functionality so if a tank blasts off a round to your right you can hear it in the right speaker. I didn't take it that far but atleast it is good to know that it supports it.

Collision
I used a small 3D ball for the bullet. To do the collision I created a Bounding Box roughly the same size of the tank. Then, I move the position of the bullet into the model's space and create a Bounding Sphere for it and do collision against the two. All of the collision code is built into XNA. It looks like this:
BoundingSphere sphere = new BoundingSphere(bulletpoint, 0.2f);
// create a bounding box for each object.
BoundingBox bbox = new BoundingBox(new Vector3(-3, 0, -3), new Vector3(3, 3, 3));
bbox.Intersects(ref sphere, out result);
if (result)
{
od.Health -= 1;
return true;
}


Conclusion
The end result is a 3D version of my original tank game that can be played on multiple computers. Some extra features that could be tossed in there is chatting, explosions, etc. That's as far as I'm going with this game.

Tank Wars Single Player with 20 NPC Tanks:


Next time we'll discuss level design and make some plug-ins for Artismo to produce the levels.

Happy Coding!

Jason

Sunday, November 14, 2010

XNA 3D Models


Creating a character from start to finish requires a game plan. I used to work with a content artist that would spend about 8 hours working on a single plant. So, when you're talking about a fully rigged and textured character with multiple animation sequences you start measuring the task in days. And, if it's a main character it may be a few weeks.

This model above is of John Crighton from the Sci-fi Show FarScape. By the way, if you haven't already, I highly recommend it. Give it a few episodes to get over the puppet factor and it's a really good storyline (Thanks Matt!). Anyway, this character is fully rigged and textured (1900 polys). It took around 8 hours to complete.

I used a simple mirror tool (In my editor, Artismo) to keep the character symmetrical. And, used extrude and line-flip and line-split functions to shape the character. After finishing the basic shape you want to save a copy for future models to add to your 3D tool box. Note: If you want a copy of my basic model let me know.

Once you are finished with the shape of the character, you should begin building a basic skeleton. While you're making the skeleton, add some extra bones for the lungs and for the neck as shown here:


You now have a base skeleton and character for any of your characters. You just need to customize them. Note that I didn't attach the model to the skeleton at this time. Since this is a generic character you may end up changing the shape before you're ready to rig it to the bones.

After doing the rigging, then it is time to paint the character. One mistake I've been guilty of is painting too many of the shadows especially around the neck and face. These fake shadows turned out looking really bad. It is better to use the model geometry and a light shading to augment the character shape. It's not like 2D drawing. This model started looking a lot better after I removed those shadows.

One tip to keep in mind when texturing is to lay out your geometry on the texture so you can line things up. You don't want to have the backs of the legs pointing upside down if you have to wrap some detailed clothing around it. By the way, next time you're walking around take a look at the patterns on people's clothes and how they wrap. You may notice that none of the patterns line up correctly on the seams. But, they're good at hiding the seams where you won't notice! Keep that in mind when you do your textures.

That's about it for now. I've got work to do on my 3D tank game and my next character is Dargo from Farscape. If you want a copy of Artismo let me know.

Jason

Monday, November 08, 2010

C# .NET Asynchronous Sockets Tank Game


First, let me say that this project was not about the graphics and game play. I wanted to try out some Asynchronous Client Sockets in C#. Getting sick last week was a good opportunity to try it out since I wasn't going anywhere. I came up with this little Tank Wars game.

I kept the client really simple by using GDI+ to draw the bitmaps on the screen. It just communicates the key events to the server. All of the game logic and scoring is handled by the server. Add some basic scoring and sound effects and we have Tank Wars!

I did hit a roadblock when I decided to add some sound. I used a simple class called SoundPlayer in C#. This was great for the Tank shot but was unable to play multiple sounds at the same time. So, I think it is time to call this exercise finished and move on to the next version.

Overall, it was a fun little couple hour project that got me exposed to what happens behind the scenes.

For the next version:
- DirectX Client.
- Really good sound support.
- Polish up the full GUI.
- Make the Server Public so Client can be downloaded.
- Support a SinglePlayer mode.

Feel free to leave any questions or comments. I can even post some code up here if anyone is interested.

Happy Coding!
Jason

Related Links:
Asynchronous Socket Programming in C#
PlaneShift Video on MMORPG Design.

Sunday, July 11, 2010

DirectX 2D Sprite Animation


I've been working on my first plug-in for Artismo 0.11.5 (dev). The Sprite Capture Plug-in will take the current animation sequence and export the animation to a bitmap as a 2D sprite map for import into any 3D Isometric engine.

The benefit of this plug-in is to quickly generate realistic 3D animations and run them in 2D. Several games use this technique. For example Diablo, WarCraft III, StarCraft, and other 2D sprite engines.

I had written a program in the past to allow me to create these animations by hand, but I had to draw every frame. So, a walk sequence which had 10 frames had to be drawn in 8 directions which was 80 frames for one animation sequence. So, if you wanted to have the character swing the sword while walking, that was an additional 80 frames.

With this tool, I create the 3D model with animation, and export any sequence I want. The penguin above is the test model. There are a few minor tweaks but this plug-in is almost ready.

Happy Coding!
Jason

Sunday, June 27, 2010

DirectX 3D Modeling in Beta Testing


I released the beta of my editor this weekend. This evening I began working on the car shown above. I'll post a finished shot when I'm done.

I'm looking for a few 3D projects that I can supply my software to for feedback. It exports animated .X files and I have working examples of how to animate the meshes in XNA and DirectX. If you have a 2D or 3D project, this may be the tool for you. I'm working on a tool right now that will export all the animations in a 2D format for sprite engines. If you're interested in beta testing please let me know.

Happy coding.
Jason

Friday, June 11, 2010

Think out of the Box


Just a short thought on solving hard coding problems. We all know that when it comes to writing code, there are usually several ways you can do something. If the way you're doing something seems really difficult, try stepping back and attacking it from a different angle.

We're not talking about code snippets here. If you're searching for specific code, you can probably find a sample out there. But, as Dex from Starwars would tell you, there's a difference between knowledge and wisdom. Applying the knowledge is where the money is! Do some research and see how people are solving similar problems. And, carry some paper with you so you can doodle designs on the go.

Most importantly, don't be afraid of failure. Just because you think it will work doesn't mean that it will, but it brings you one step closer to fully understanding the problem. Prototyping is your friend.

Happy Coding!
Jason

Friday, May 14, 2010

Bevel Algorithm


I've been working on this bevel algorithm for about a month now. Actually, this is the second bevel algorithm I've written for this. The above box was beveled three times in a row. I added some colors just to show off the geometry.

So, with this algorithm there were two challenges. First, was writing an algorithm that worked on all primitives multiple times. The other was support for the bevel gizmo that allows the user to bevel the object in realtime.

This is also the first modifier I have that displays text next to the gizmo so no panels with controls are required to perform the task. Slightly off subject, I tried using blender the other day and my editor is SO much more user friendly! If you use blender, you'll love mine.

I still have a lot of work on it but it's nice to be heading in the right direction.

Happy Coding!
Jason

Wednesday, December 23, 2009

3D Modeling: Mech Animation

My goal was to model a mech robot. When I first started this model I thought it would be a lot faster than an organic object like a human. And, my first attempt was really fast.
It took me about 5-10 minutes to make this model:


But, when I tried to texture it I found that it was quite a different process. Instead of being one model, it's more like creating a collection of models. I attempted to texture it twice before I realized this wasn't working. So, I decided to take a different approach. I created a few parts that I could reuse in multiple places and textured them individually. The result was a much nicer model.
Here is the video of the walk sequence.


Going through this process exposed a few bugs in my program that needed attention. My process involves using my tools and discovering things that need improvement or are missing. Then, fixing the tool so that things go smoother. The reward for me is not only the model but the ritual. Someone recently told me that a good programmer has to be a perfectionist. Always paying attention to every detail. There's another profession I can think of that requires that same skill. Only it comes from the other hemisphere of the brain...

Happy Coding!
Jason

Sunday, November 29, 2009

Major Tom

This weekend I worked on reproducing the "Major Tom" song by Peter Schilling. I threw some pictures together to create this video for it.


While I was making this song my computer started to wig out. It would shut down after about 10 minutes and wouldn't restart. Well, I checked to make sure everything was properly seated, accidentally dropped the whole thing, and that seems to have done the trick. Now I'll be able to finish the end of the song properly.

Jason

Sunday, November 01, 2009

DirectX Shaders - Specular Highlighting

I've been working on shader support for my editor for the last few days. So far I've been able to apply a basic vertex and pixel shader to the directx rendering pipeline. My goal is to make some basic material parameters available to the user without getting too complex.

This picture is shows a model (1900 triangles) I made in the tool and the specular highlighting I was playing with. Note how he kind of looks like he is made out of plastic.


I'm REALLY close to a beta on the editor. I'm down to wrapping up the materials and finishing up the help files and I should have a downloadable version here before the year is up. I've been really busy with a class lately so that kind of slowed things up.

Happy Coding!
Jason

Thursday, October 29, 2009

Brain Processing Theory - Processor 4 on fire!


A few years ago a friend of mine was describing his brain like a computer, which originally had four processors. And, as you get older these processors start to burn out. I thought it was a good illustration and then the other day I realized that I think I lost a processor!

I was sitting there trying to remember "The Magic Solution" I came up with for a problem at work. Although I could remember the "What" it was supposed to do, the "How" seemed to have slipped my mind. It was like I had lost a few of the essential puzzle pieces. I just couldn't walk through the thought process to come to that solution. This is when I noticed the smoke coming out of processor 4! And, processor 3 mockingly pipes in with the Brain Processing Theory.

I sit in denial forcing myself to load "The Magic Solution" back into memory only to receive negative response from processors 1-3. They reply: "We don't want anything to do with work from processor 4 or anything else that requires 4 processors! And next time you better be ready to bargain with some sugar or something."

Now, I'm missing processor four. But, maybe the Brain Processing Theory needs to be expanded just a little... Maybe its a type of self preservation? Maybe Processor 4's main purpose wasn't to process mass quantities of variables and detailed designs and it just decided that enough was enough? Maybe all the processors are in on it and they're taking turns on vacation? No... I'm in denial again. I'm just down to 3 processors at 34. But, I guess there's always a bright side......... Darn it! That must have been on processor 4!

Has this happened to you? Let me know.

Happy Coding!

Jas

Tuesday, July 28, 2009

Advertised Shortcuts: Remember the Mulder!

I ran into a strange issue with an installer the other day. I needed to update two computers so I walked over and copied a new exe into the install directory and walked away. Three days later I noticed that the old program was back on those computers. Were these the same computers? All of the settings changes I made were still there.

A week later, I ran another program and noticed that everytime I performed a task that created any kind of files, the program showed a reinstalling form when trying to run it from the shortcut. I also noticed the shortcut target was not the exe. Hmm, this sounds like something from one of those Microsoft Conferences last year that they were raving about... Something about how Word could be damaged and even uninstalled and would be automatically fixed...

Welcome to Advertised Shortcuts! This behavior is part of the "resiliency" feature of the Windows Installer. When you create a shortcut with your install package they aren't shortcuts to your program. They are shortcuts to the Windows Installer which will check the version installed and if it is modified, will change it back to the proper state. It triggers resiliency.
http://support.microsoft.com/?id=290997
newsgroup info: Clicking on created shortcut trigers...

There are definately some benefits to this feature. For example, it blows away your app if it gets a virus. And, it gives you a warm and fuzzy feeling to know that your software is not going to be abused by someone.

Now for the really bad news. This can be a problem if your program has any external files in the target directory. For example, log files, data files, config files (including changes to the exe.config), temp files, etc. If your program changes anything in there, the next time you click on it, POW! You've just triggered resiliency. Which means your user is watching an installer run and boy I hope it works because if it doesn't they won't be happy. Wait they don't have access rights to install? Oops. Time to panic.

Okay, surely there's a way to just configure the installer package to not use advertised shortcuts? NOPE!! The answer suggested is to use another utility besides Visual Studio to make the installer package such as WIX or InstallShield. Huh? Have you tried WIX? You've just turned your 1 hour install package into an 8 hour march of death. 6 months from now some other programmer will stare in disbelief at that WIX package wondering whether you were chasing the dragon on that day.

There is actually only one flag that needs to change in the install package.
It is: DISABLEADVTSHORTCUTS and it needs to be set to 1.

Now, for the really really bad news. There is no GUI support for this flag! Don't worry, there's a solution.:) What you have to do is download the "Installer SDK" from Microsoft. No, I'm not kidding... You have to install the Installer SDK! You know we all have that. :)

Then, you run ORCA which is a tool to manipulate the data tables for a package and you add this property into the Property tables manually after you build the installer.
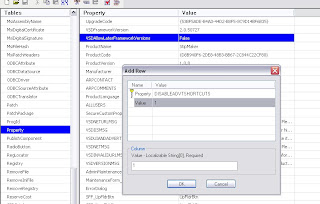
If you want to set it up as a Post Build Event in visual studio it is possible. Follow the instructions here:
http://www.discussweb.com/c-programming/13643-advertised-shortcuts-installers-how-avoid.html

Wait, you don't like this solution? Well, some people write a custom step in their installer or even there executable to delete the advertised shortcuts and put back regular ones using IShellLink. (Refer to the last link if you want to go this route).

So, the moral of this story kids is installers are getting scary. Or rather, the Operating System you're installing on is paranoid and suffering mental disorders. Remember, Mulder from X-files? TRUST NO ONE.

REMEMBER THE MULDER!
AND
HAPPY CODING!
Jason

Wednesday, July 15, 2009

Hard at Work

It's been awhile since a post. I thought I would throw this up here. This is a picture of me hard at work at the office.


I've been working for the past few months on about 80 updates to my 3D editor. Definately a move in the right direction. I'm currently testing the registration and update system and rewriting a better UV Mapping editor/ art tool. I'm hoping to post some tutorials here on how to use the program when it is ready for download. Beta version will be done soon.

At the office, I'm working on extracting data from a word form and putting the data in another word form. Fun stuff. I have a nice little tool that uses a rules file to convert the documents.

Remember to have lots of beverages when coding! That way you get out of your chair at least once an hour whether you want to or not. :)

Happy coding!
Jas