This was using four key frames. My next task will be to clean up the code, and save the bone animation to file for reloading. After that I'll start working on attaching geometry to the skeleton. Woo Hoo! Can you tell I'm having lots of fun?
I'm pretty sure the attached mesh will have issues in certain areas but I'm hoping that within a few weeks I'll have my first animated mesh and shortly after that my first animated .x file. My goal here is to create a walk sequence and load the animated mesh into a demo game engine. I still haven't figured out how I'm going to let the user edit the geometry. That's going to be quite a shift in process flow. Oh well.
Happy Coding!
DXJas
Monday, May 26, 2008
DirectX Skeletal Mesh Cont.
I've been making progress on my animation. So far I can add bones and frames and animate the bones. See this video of my first animation of a hand.
Tuesday, May 06, 2008
DirectX Skeletal System

Now that I'm able to create static meshes, I've begun developing a skeletal system that will allow me to animate them. (See screenshot)
Next, I'll add gizmos to manipulate the bones, including forward and inverse kinematics, and start playing with key frames and animation.
The last stage involves attaching the mesh to the skeleton. In some areas it will be necessary to assign vertices to multiple bones to smooth the animation a little.
I would be happy to here from some of you on what features you feel are essential in a skeletal system. Is path-based movement important or is it easier to create a few key frames? Do you break up your sequences on the mesh for different body parts so they can be combined? For example, the character can play the run sequence AND the eat sequence at the same time?
Fun stuff! I'll probably be working on this area for the rest of the year.
Slightly off the subject, the best character editor that I ever saw was the character creator in City of Villains. Another good one was in the Spore Video created by Will Wright, the maker of Sims.
Happy Coding!
Jas
Monday, March 17, 2008
SQL Reporting Services: Dividing by Zero
You finally finish that report in SQL Reporting Services that you've been slaving over and find that there is a big ugly #Error text in the middle of your data. You can't publish that! But, how do you handle it? Lets cover a few ways of fixing this.
Sample data:
Your first try at protecting from the divide by zero error might be something like writing an expression in the value field like so:
This wouldn't work. Why? the Reporting Services compiler evaluates the results before the IIF. So, the compiler attempted the division by zero before applying the IIF expression. (Thanks Dataman!)
There are a few ways to handle this.
1. Denominator DeColorization
A quick way to avoid this is to write a little expression for the font color that will turn the font to white if the denominator = zero.

2. Denominator De-Demonization.
This is the "Dataman" approach when you REALLY feel the urge to fix the data because otherwise the universe may be out of alignment. :)
3. Division SafeCode Routine.
This is pretty cool. In Reporting Services, in the Report Parameters there is a tab for Code. You can put in a custom function and call it in your report. The code would be like so:
In your report you would just set the value like so:
That's all for pesky #Error messages in your code.
Happy Coding!
P.S. Thanks goes to Charley for your input.
Jason
"We are the musicians. We are the dreamers of dreams." - Willy Wonka
Sample data:
| Budgeted | Spent | % Avail |
|---|---|---|
| 1000 | 500 | 50.00% |
| 0 | 100 | #ERR |
Your first try at protecting from the divide by zero error might be something like writing an expression in the value field like so:
= IIF( Fields!Budgeted.Value=0, 0, Fields!Spent.Value / Fields!Budgeted.Value)
This wouldn't work. Why? the Reporting Services compiler evaluates the results before the IIF. So, the compiler attempted the division by zero before applying the IIF expression. (Thanks Dataman!)
There are a few ways to handle this.
1. Denominator DeColorization
A quick way to avoid this is to write a little expression for the font color that will turn the font to white if the denominator = zero.
= IIF( Fields!budgeted.Value = 0,"White","Black")

2. Denominator De-Demonization.
This is the "Dataman" approach when you REALLY feel the urge to fix the data because otherwise the universe may be out of alignment. :)
= IIF( Fields!Budgeted.Value=0, 0, Fields!Spent.Value / IIF( Fields!Budgeted.Value=0,1,Fields!.Budgeted.Value))
3. Division SafeCode Routine.
This is pretty cool. In Reporting Services, in the Report Parameters there is a tab for Code. You can put in a custom function and call it in your report. The code would be like so:
Public Function SafeDivide(Numerator as Double, Denominator as Double) as Double
If Denominator = 0 then return 0
Return (Numerator / Denominator)
End Function
In your report you would just set the value like so:
>=Code.SafeDivide(Fields!Spent.Value, Fields!Budgeted.Value)
That's all for pesky #Error messages in your code.
Happy Coding!
P.S. Thanks goes to Charley for your input.
Jason
"We are the musicians. We are the dreamers of dreams." - Willy Wonka
Monday, February 11, 2008
Face Texture Mapping

Well, I'm working on version 0.0.6 of my 3D Editor. I'm currently adding a UV Mapping tool and its coming along nicely. When I'm done, it will have a good set of tools for creating textures. No need to export and import into another art tool. I've included a head that I did this weekend. This build has been very stable and few bugs noted. Next will be animation.
If anyone is interested in trying out my beta version of the software, let me know. I will also be adding support for exporting 2D templates for 2D engines as well. 3D is exported in .x format right now. But, it also exports xml if you need to read them into your engine that way.
Happy Coding!
Jas
Tuesday, October 23, 2007
ASP.NET ObjectDataSource Setting the Object
Lets say you have a business object on your webpage and want to bind some listbox or something to it. You can use the ObjectDataSource object but you have to handle the ObjectCreating event for the ObjectDataSource. In your handle just set the ObjectInstance argument and you're good to go.
Reference:
msdn2.microsoft.com article
Happy Coding!
Jas
Reference:
msdn2.microsoft.com article
Happy Coding!
Jas
Friday, October 05, 2007
Binding with ObjectDataSource
It seems like every time I write a page that retrieves data, I end up writing the mega search page. It takes a lot of extra code to search by several criteria including date ranges and sort types. You've probably seen these before. Something like the following image:

Now, one way of handling this might be to write a case statement in the search event and write the sql query dynamically for each search type. That's one way to drive yourself insane. Why? Because your query will be strung out across 100 lines of code mangled in a mess of case statements and code logic. When it comes time to update the query its not going to be fun.
One thing that worked well for me is binding the GridView to an ObjectDataSource. I wrote a simple base class for my queries with a generic function for running a query.
Example:
public virtual DataTable RunQueryRange(string criteria,string dtstart,string dtend)
{
return mDT;
}
For each query type that you have, create a new class that inherits from your base class. Override the RunQueryRange function and place your query in there. Just a nice clean query that might pass that string off to a function in your base class that runs a SqlCommand and returns a dataTable. That way you're not writing the Connection code everytime. Once you're rolling it takes you about 30 seconds to create a new search type and add it to your page. Code might look like this:
public override DataTable RunQuery(string criteria)
{
SqlCommand cmd = new SqlCommand("spSearchByEyeColor");
cmd.CommandType = CommandType.StoredProcedure;
cmd.Parameters.Add("@EyeColor", SqlDbType.VarChar).Value = criteria;
//pass dummy date params to procedure.
cmd.Parameters.Add("@DTStart", SqlDbType.DateTime).Value = System.DBNull.Value;
cmd.Parameters.Add("@DTEnd", SqlDbType.DateTime).Value = System.DBNull.Value;
return base.RunSqlCmd(ref cmd);
}
So, now lets say you have 10 different classes that do different queries. In your webpage, you bind the gridview to a new datasource, select object, choose your default search and choose your generic method.
Now, in your search event write a small case statement that will set the datasources class like so:
ObjectDataSource1.TypeName = "classQueryByDate";
Before we say we're done let me explain a little about that generic function we wrote. It expects some data. A string criteria, and some dates. Now, in my case I had to do optional date range searches. Yours might only need the string criteria. What you do is set these parameters to a control-textbox when configuring the objectdatasource. So, whenever the thing fires, it will grab whatever you put into the textbox and pass it to your class. That's the key. Now, in the case of date ranges, I always pass values into my classes but I don't always use them if they're not required. You'll probably need to play with it a little. I found the objectdatasource would hang up sometimes if I didn't have default values for those dates.
Another thing you'll need to juggle is postbacks. I automatically set the ObjectDataSource1.TypeName every time based on the search.SelectedValue in the dropdown. This solved my problems.
So, the idea here is writing code that is easy to update and maintain. If someone says, can you add a search by hair color to that? You can do it in a minute or so.
Keep in mind there may be a hundred ways to do this. This is just one of them. If you have other ways you would like to share I would love to here them. Specifically if you've been able to remove the switch statement in the search event completely by using some factory pattern or something, please share.
Happy Coding!
Jas
Tuesday, June 12, 2007
What not to do with a progress bar.

This morning I installed an update for adobe software. As the software updated this dialog would display progress from 0% to 50% over and over again for over a minute. The text on the dialog didn't change at all during the process. It just seemed to be stuck in one of those out of control infinite updater loops from hell where it tries to perform a task and can't so it just keeps trying over and over again until you run out of patience and kill it. For your software you may think of a few other ways to utilize the progress bar and dialog in your apps.
First, the progress bar does go all the way to 100%. Test your update dialog and make sure it is listing the progress smoothly.
Second, If you have a long install you have a few choices. One way to do it is to break them up into a bunch of small tasks and display progress of each individual task and properly display and update the message to the user so that they know what your updater is doing.
Third, and probably the best way for a large update is to show the total progress for the entire update and change the message text to indicate that something is actually being done. Your users really want to know how long its going to take so that they can get on with their life. Why not tell them? That's why this is the best choice.
This updater is a good example of an update dialog. This is an updater for a Blizzard product. It shows the progress of the udpate, the percentage completed, and even tells the user an estimated time to completion. It even has some blinky lights in the title bar that indicates that its doing something!

P.S. The game is pretty good too.
Happy Coding!
Jas
Monday, May 07, 2007
Unit Testing and Mock Objects with NMock2 in VB.NET
I've been reading through Jean-Paul Boodhoo's article in Code Magazine "Layered Architecture, Dependency Injection, and Dependency Inversion" and spent some time reading up on the presenter pattern in his original article on microsoft's site in Design patterns on the Model View Presenter.
http://msdn.microsoft.com/msdnmag/issues/06/08/DesignPatterns/
In his article he explains the benefits of using mock objects in your unit tests. Although this post isn't going to go over the details of the article I will cover how I migrated his C# example to VB.NET and other issues I noted in the article.
First, the NMock2 framework is a useful tool for unit testing. Its a tool that can be added to NUnit to enhance your NUnit tests. If you aren't familiar with unit testing with NUnit I suggest starting there.
This is a sample of an NMock2 test found on the design patterns article:
C#:
[Test]
public void ShouldLoadListOfCustomersOnInitialize()
{
mockery = new Mockery();
ICustomerTask mockCustomerTask = mockery.NewMock();
IViewCustomerView mockViewCustomerView =
mockery.NewMock();
ILookupList mockCustomerLookupList = mockery.NewMock();
ViewCustomerPresenter presenter =
new ViewCustomerPresenter(mockViewCustomerView,
mockCustomerTask);
ILookupCollection mockLookupCollection =
mockery.NewMock();
Expect.Once.On(mockCustomerTask).Method(
"GetCustomerList").Will(Return.Value(mockLookupCollection));
Expect.Once.On(mockViewCustomerView).GetProperty(
"CustomerList").Will(Return.Value(mockCustomerLookupList));
Expect.Once.On(mockLookupCollection).Method(
"BindTo").With(mockCustomerLookupList);
presenter.Initialize();
}
Without duplicating the article and taking this line for line I'll just point out a few obvious things. Its a function with an NUnit annotation that tells Nunit it is a test. It creates a mockery class, some objects, and it runs three tests. Now, if you were to run this against your code it would completely pass assuming all your interfaces are created. Why? because the article left out that in the sample code this function also exists in the test code:
C#:
[TearDown]
public void TearDown()
{
mockery.VerifyAllExpectationsHaveBeenMet();
}
This little tidbit gets the mockery class to spit out the results of the tests. Okay, now you have a test that fails... Now lets take a look at the VB.NET version.
<Test()> _
Public Sub ShouldLoadlListOfCustomersOnInitialize()
mockery = New Mockery()
Dim mockCustomerTask As ICustomerTask = mockery.NewMock(GetType(ICustomerTask))
Dim mockViewCustomerView As IViewCustomerView = mockery.NewMock(GetType(IViewCustomerView))
Dim mockCustomerLookupList As ILookupList = mockery.NewMock(GetType(ILookupList))
Dim mockLookupCollection As ILookupCollection = mockery.NewMock(GetType(ILookupCollection))
Expect.Once.On(mockCustomerTask).Method("GetCustomerList").Will(NMock2.Return.Value(mockLookupCollection))
Expect.Once.On(mockViewCustomerView).GetProperty("CustomerList").Will(NMock2.Return.Value(mockCustomerLookupList))
Expect.Once.On(mockLookupCollection).Method("BindTo").With(mockCustomerLookupList)
Dim presenter As ViewCustomerPresenter = New ViewCustomerPresenter(mockViewCustomerView, mockCustomerTask)
presenter.Initialize()
End Sub
You'll notice it's pretty much the same thing. It just has a few syntax changes but the test will work fine. I hope this helps out some VB.NET programmers when trying to get this to work. I found little documentation on it.
Happy Coding!
Jas
http://msdn.microsoft.com/msdnmag/issues/06/08/DesignPatterns/
In his article he explains the benefits of using mock objects in your unit tests. Although this post isn't going to go over the details of the article I will cover how I migrated his C# example to VB.NET and other issues I noted in the article.
First, the NMock2 framework is a useful tool for unit testing. Its a tool that can be added to NUnit to enhance your NUnit tests. If you aren't familiar with unit testing with NUnit I suggest starting there.
This is a sample of an NMock2 test found on the design patterns article:
C#:
[Test]
public void ShouldLoadListOfCustomersOnInitialize()
{
mockery = new Mockery();
ICustomerTask mockCustomerTask = mockery.NewMock
IViewCustomerView mockViewCustomerView =
mockery.NewMock
ILookupList mockCustomerLookupList = mockery.NewMock
ViewCustomerPresenter presenter =
new ViewCustomerPresenter(mockViewCustomerView,
mockCustomerTask);
ILookupCollection mockLookupCollection =
mockery.NewMock
Expect.Once.On(mockCustomerTask).Method(
"GetCustomerList").Will(Return.Value(mockLookupCollection));
Expect.Once.On(mockViewCustomerView).GetProperty(
"CustomerList").Will(Return.Value(mockCustomerLookupList));
Expect.Once.On(mockLookupCollection).Method(
"BindTo").With(mockCustomerLookupList);
presenter.Initialize();
}
Without duplicating the article and taking this line for line I'll just point out a few obvious things. Its a function with an NUnit annotation that tells Nunit it is a test. It creates a mockery class, some objects, and it runs three tests. Now, if you were to run this against your code it would completely pass assuming all your interfaces are created. Why? because the article left out that in the sample code this function also exists in the test code:
C#:
[TearDown]
public void TearDown()
{
mockery.VerifyAllExpectationsHaveBeenMet();
}
This little tidbit gets the mockery class to spit out the results of the tests. Okay, now you have a test that fails... Now lets take a look at the VB.NET version.
<Test()> _
Public Sub ShouldLoadlListOfCustomersOnInitialize()
mockery = New Mockery()
Dim mockCustomerTask As ICustomerTask = mockery.NewMock(GetType(ICustomerTask))
Dim mockViewCustomerView As IViewCustomerView = mockery.NewMock(GetType(IViewCustomerView))
Dim mockCustomerLookupList As ILookupList = mockery.NewMock(GetType(ILookupList))
Dim mockLookupCollection As ILookupCollection = mockery.NewMock(GetType(ILookupCollection))
Expect.Once.On(mockCustomerTask).Method("GetCustomerList").Will(NMock2.Return.Value(mockLookupCollection))
Expect.Once.On(mockViewCustomerView).GetProperty("CustomerList").Will(NMock2.Return.Value(mockCustomerLookupList))
Expect.Once.On(mockLookupCollection).Method("BindTo").With(mockCustomerLookupList)
Dim presenter As ViewCustomerPresenter = New ViewCustomerPresenter(mockViewCustomerView, mockCustomerTask)
presenter.Initialize()
End Sub
You'll notice it's pretty much the same thing. It just has a few syntax changes but the test will work fine. I hope this helps out some VB.NET programmers when trying to get this to work. I found little documentation on it.
Happy Coding!
Jas
Thursday, April 26, 2007
Editor Update build 0.03

I've been working on additional features for my editor. The two main items I added were:
Spherical Mapping:
While doing research for spherical mapping textures to geometry I ran across several examples and tutorials. Some of which were in published books such as 3D Game Programming with DirectX9.0c A Shader Approach. Another good one was by the zman(I'll include link later). I found that all of these examples had a rendering issue at the poles. It took me a little time to come up with a way of solving the problem. If you need to find out how to do it feel free to post a reply. I'll post this fix later when I have time.
Relative Extrusion:
Wrote a new algorithm that takes into account faces with shared edges that are to be extruded. This feature was a blast to code.
Wednesday, March 21, 2007
ASP.NET SqlDataSource Parameters Don't play with HiddenField controls
A little piece of information that might be helpful to someone...
If you have a SqlDataSource that has parameters and you are binding them to a control, you may have problems if you try binding them to HiddenField controls.
I had a simple gridview that was looking up records based on an ID. I had everything working fine with the sqldatasource bound to a session variable called session("myid"). But, I decided I wanted to cache the value on the page to eliminate timeout issues. So I added a hiddenfield to the page. In the page load event I set this hiddenfield with the ID value, just like I did with the session, but the grid would not pull the records anymore. I tried calling DataBind on the grid and even on the SqlDataSource and it doesn't pull the records.
When I changed the variable back to a session variable it worked just fine. I didn't have to call Databind. The SqlDataSource is smart enough to detect a change in the parameter and will refresh.
I also tried using a label control. This one worked fine too. In my instance, I just wrote at the top of the page "Welcome [label with my userid]" and I was on to the next task.
Happy Coding!
Jas
Monday, March 19, 2007

Friday, February 16, 2007
VB.NET 2005 MDI Docking to Floating Window
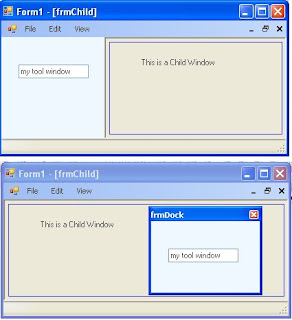
Have you ever wanted to create a tool panel that can dock on your GUI and free float as a tool window anywhere no the screen?
You may think that you can just create a child window and set its mdi parent and dock it to the left. But there are issues with this approach when you make it floating and try to redock it. Especially if you have a child window that is using that area of the screen. What I propose here is to to use panels to pull off the trick.
The first step is to create an MDI Parent window. Just create a new project in vs2005 (VB or C#) and set the "IsMdiContainer" property to True. Go ahead and add a menustrip and add a view option with sub options of Left, Right, Floating.
Next, we want to add a panel to the form and dock it. Go ahead and add panel1. Dock it to the left and throw a textbox on it for testing. Write the code in the menu events to change the dock property of your form. Leave the floating event blank. We'll get to that... If you run your app, you should be able to switch the docking to left and right.
Create a new form called frmTools. This window will be the container for our panel when we want it to float. Change the FormBorderStyle to SizableToolWindow. Now hit F7 to go to the code view. Add 2 member variable. 1 panel called mPanel and 1 Form1 call mParent. Modify the constructor of frmTools so that you can pass in a reference to Form1 and a reference to a panel. Set these variables before "Initializecomponent."
Next, create a private function call InitPanel(). What we'll do here is add the panel to the Controls Collection so that it can be rendered. You'll also want to set the Dock property to DockStyle.Fill and remember to use the SuspendLayout() and ResumeLayout(). Essentially, what we've done is create a secondary "Initializecomponent" function. I wouldn't recommend changing the "Initializecomponent" to do this code as it could cause issues during design time in Visual Studio 2005 designer. Once you've created this function call it in your constructor function after "InitializeComponent()."
Now, lets go back to Form1. In the event for View->Floating we'll create the frmTools window and call Show().
private void floatingToolStripMenuItem_Click(object sender, EventArgs e)
{
Form1 form = this;
frmTools tools = new frmTools(ref form, ref panel1);
this.SuspendLayout();
this.Controls.Remove(this.panel1);
this.ResumeLayout(false);
this.PerformLayout();
tools.Show();
}
Notice that I created a form and set it to "this" and then passed the reference to form into the function. There are other ways of referencing the main form. This was just a quick and dirty way. Maybe we'll get into that on another day. :)
public void SetToolPanel(ref Panel panel)
{
this.SuspendLayout();
this.panel1 = panel;
//set the dockstate to default.
panel1.Dock = DockStyle.Left;
this.Controls.Add(this.panel1);
this.Controls.SetChildIndex(this.panel1, 0);
this.ResumeLayout(false);
this.PerformLayout();
}
What we're doing here is something similar to "InitializeComponent()." We're just adding this control back in. Notice that I called "Controls.SetChildIndex." I did this because if you don't have these controls in the right order it could affect other docking controls. If you were to comment out this line and test, it would mess up the docking on your menustrip. So, remember to set it properly in your app.
private void onClosing(object sender, FormClosingEventArgs e)
{
//Pass it off to the parent.
mParent.SetToolPanel(ref mPanel);
//Remove the control so it doesn't get ditched.
this.Controls.Remove(mPanel);
}
You may think that you can just create a child window and set its mdi parent and dock it to the left. But there are issues with this approach when you make it floating and try to redock it. Especially if you have a child window that is using that area of the screen. What I propose here is to to use panels to pull off the trick.

The first step is to create an MDI Parent window. Just create a new project in vs2005 (VB or C#) and set the "IsMdiContainer" property to True. Go ahead and add a menustrip and add a view option with sub options of Left, Right, Floating.
Next, we want to add a panel to the form and dock it. Go ahead and add panel1. Dock it to the left and throw a textbox on it for testing. Write the code in the menu events to change the dock property of your form. Leave the floating event blank. We'll get to that... If you run your app, you should be able to switch the docking to left and right.
Create a new form called frmTools. This window will be the container for our panel when we want it to float. Change the FormBorderStyle to SizableToolWindow. Now hit F7 to go to the code view. Add 2 member variable. 1 panel called mPanel and 1 Form1 call mParent. Modify the constructor of frmTools so that you can pass in a reference to Form1 and a reference to a panel. Set these variables before "Initializecomponent."
Next, create a private function call InitPanel(). What we'll do here is add the panel to the Controls Collection so that it can be rendered. You'll also want to set the Dock property to DockStyle.Fill and remember to use the SuspendLayout() and ResumeLayout(). Essentially, what we've done is create a secondary "Initializecomponent" function. I wouldn't recommend changing the "Initializecomponent" to do this code as it could cause issues during design time in Visual Studio 2005 designer. Once you've created this function call it in your constructor function after "InitializeComponent()."
Now, lets go back to Form1. In the event for View->Floating we'll create the frmTools window and call Show().
private void floatingToolStripMenuItem_Click(object sender, EventArgs e)
{
Form1 form = this;
frmTools tools = new frmTools(ref form, ref panel1);
this.SuspendLayout();
this.Controls.Remove(this.panel1);
this.ResumeLayout(false);
this.PerformLayout();
tools.Show();
}
Notice that I created a form and set it to "this" and then passed the reference to form into the function. There are other ways of referencing the main form. This was just a quick and dirty way. Maybe we'll get into that on another day. :)
In addition, we removed the item from the controls collection. Now, in testing I was able to remove this code completely and got the same results but lets play it safe. (BTW: If you know why this is so, please comment on the blog, thanks.)
Anyway, if you run your application you get your panel to float! Not to bad. One problem remains though. If you close the tool window your panel is now gone. Its been destroyed with the frmTool Control collection. So, we need to let the Parent window know that we are done with the panel. And we have to code a function in the parent window so that it can reinitialize the panel.
In Form1, create a new function called SetToolPanel(ref Panel panel).
public void SetToolPanel(ref Panel panel)
{
this.SuspendLayout();
this.panel1 = panel;
//set the dockstate to default.
panel1.Dock = DockStyle.Left;
this.Controls.Add(this.panel1);
this.Controls.SetChildIndex(this.panel1, 0);
this.ResumeLayout(false);
this.PerformLayout();
}
What we're doing here is something similar to "InitializeComponent()." We're just adding this control back in. Notice that I called "Controls.SetChildIndex." I did this because if you don't have these controls in the right order it could affect other docking controls. If you were to comment out this line and test, it would mess up the docking on your menustrip. So, remember to set it properly in your app.
Next, we need to modify the frmTools window so that it passes this panel back to the parent when its closing. In the properties window of frmTools, click the Events lightning bolt and override the "FormClosing" event under "Behavior." Call it onClosing. In this function we're only going to call "SetToolPanel" and remove the panel from the control collection so it doesn't get wiped out.
private void onClosing(object sender, FormClosingEventArgs e)
{
//Pass it off to the parent.
mParent.SetToolPanel(ref mPanel);
//Remove the control so it doesn't get ditched.
this.Controls.Remove(mPanel);
}
Thats it. Running the program you'll have a floatable dockable panel for your app. While testing, type something in the panel's textbox to show that its the same panel when it cycles through its states.
If you need source code let me know...
Happy Coding!
Jas
Tuesday, January 23, 2007
3D Blueman

This is a quick post of the first human head I've done in my editor (120 polys). I'm working on build 0.03 now. This one exports .x files for import into engines. Although it does texture mapping this picture doesn't show it. I'm really trying to keep the feature set down to a minumum until I work out the geometry workflow.
Happy Coding!
Jas
Tuesday, November 07, 2006
3D Desk
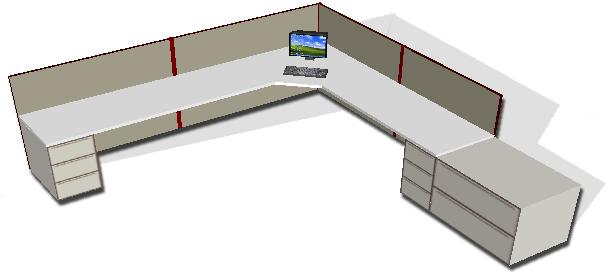
Well, I got to use my editor at work today. They needed a graphic of an 8 x 10 cubicle for our case managers. Kakoa, our Visio guru was out today, and so I gave it a go with my new editor. I didn't have much time to do the modeling but it turned out okay. I added a little shadowing in Photoshop but that was about it.
Happy Coding!
Jas
Monday, November 06, 2006
SQL Views with an ID column
I was recently given the task of replacing a table with a view and this table had an id column. There is a way to represent this id column in a view.
The following article explains the way to handle it:
http://support.microsoft.com/kb/186133
Keep in mind the limitations of this approach. Your row count can't be that large. If you have a large set of data and can use snapshots, consider using a temp table filled periodically for reporting. This will improve your query size and enable additional indexes if you require them.
Happy Coding!
Jas
Tuesday, October 10, 2006
SQL Case Statement Where? Use the "Dataman Maneuver"

Lets say you have an ice cream application. And you have two tables. One for storing the base ice cream and another for storing the actual flavors that are offered by the store. Your tables would have the following data:

Next, lets say that you have a dropdown for the base ice cream type which stores as its value the bid. In addition, one of the options is "ALL" with a value of "0." How would you write a query that will give you the rows from tblFlavors?
In VS.NET 2.0 you can add parameters to your selectcommand in the sqlDataSource control. Then, you can configure the parameter to get the value from your dropdown box. But, you have to do some work on the query to get this to work... Enter the Case statement in the where clause. Also known ast the "Dataman Maneuver" by certain trekky programmers with the initials of CRJones. :) You can visit Charley Jones at http://crjones.com
At first attempt you might try:
SELECT * FROM tblFlavors f
WHERE f.bid = @bid
This would work, but what would happen when you select the "All?" You wouldn't get any rows. You don't have any rows with a BID of 0. Enter the power of the Case statement in the where clause.
When you take a look at the where clause above, the WHERE clause is comparing the value of the bid for each row to the parameter @bid. This is a boolean operation. It is either true or false. All it cares about is whether the variables on both sides of the operator are the same datatype and that it can compare them. So, this allows us to do some crazy things with cases.
Lets try something else:
SELECT * FROM tblFlavors f
WHERE (Case when @Bid = 0 then 1 else 0 end) = 1
In this statement what are the two variables that are being compared? The right side is a 1, and the left side is whatever my case spits out. The database is smart enough to execute the case first and then compare the result against your 1. If you were to run your application, it would only work when you selected the "All" option. If you selected another option such as Vanilla, you would get nothing because @Bid would be = to 1 and in the above 1 isn't 0 so it returns 0. 0 doesn't = 1.
The solution is:
SELECT * FROM tblFlavors f
WHERE (Case when @Bid = 0 then 1
when @Bid = f.Bid then 1 else 0 end) = 1
Here it will check the first statement.
Does @Bid = 0?
yes: return the 1.
no: check the next one.
Does @Bid = f.Bid?
yes: return the 1.
no: go to else which returns 0.
Now, it checks the case value to 1 and if this is true you get your row.
Happy Coding
Friday, July 28, 2006
Cool Controls: Custom Validators
Custom validators are pretty cool to use in ASP.NET 2.0. There are quite a few samples on the web for getting these hooked up. However, most of the samples are REALLY simple in the client-side script. I wanted to throw this one out there just in case someone else has to do something similar.
The Sample:
Lets say you have a checkbox and a DropDownList, and you want the DropDownList to have validation on it only when the checkbox is checked. When the checkbox is not checked you want the DropDownList disabled. Okay, sounds pretty simple, but can we do it without a postback.
Toggling the Disabled property
The JavaScript to toggle the DropDownList disabled property can be done like so:
<script type="text/JavaScript">
function Change(chkfield,field)
{
if (chkfield.checked == true)
{ document.getElementById(field).disabled = false; }
else
{ document.getElementById(field).disabled = true; }
}
</script>
Notice that I'm passing in the checkbox object and the field to be disabled. The DropDownList will be called "dd1."
In the checkbox you just plug in the function like so:
<input id="chk1" title="chk1" onclick="Change(this,'dd1')" type="checkbox" value="X" name="chk1">MyCheckBox
Adding the CustomValidator
Next we add the CustomValidator control after the checkbox. The code would like the following:
<asp:CustomValidator
ID="CustomValidator1" runat="server" ClientValidationFunction="Checkit" ControlToValidate="dd1"
ErrorMessage="Required Field" Font-Size="Large">*</asp:CustomValidator>
With the CustomValidator control you can supply a "ClientValidationFunction" that will be called. Remember to provide a server-side function as well because if you don't it can be a security risk according to Microsoft. For this example I left that out.
The Validation Function
The validation function, called "Checkit" in this example, will check the validation of the DropDownList "dd1."
This function would look like this:
function Checkit(sender, args)
{
if(!document.getElementById(sender.controltovalidate).disabled && args.Value=="bad")
{
args.IsValid=false;
}else{
args.IsValid=true;
}
}
Anyway, that's it for the Custom Validator control. Another cool control in the ASP.NET arsenal.
Happy Coding!
DX Jas
Thursday, July 06, 2006
Problem stretching images with GDI+

I've noticed a problem when trying to zoom in on an image using the DrawImage method. The above image shows the problem. Basically, if you scale the image, the first row and column doesn't get scaled correctly. I've posted the problem twice on Expert-Exchange but have not found an explanation or fix yet.
I created a test app that takes a 40x40 bitmap with a checkerboard pattern and zooms it by a zoomfactor. The render code is as follows:
Protected Overrides Sub OnPaint(ByVal e As
System.Windows.Forms.PaintEventArgs) Try
If (bmp Is Nothing) Then
Else
Dim g As Graphics = e.Graphics()
g.SmoothingMode = Drawing2D.SmoothingMode.None
g.InterpolationMode = Drawing2D.InterpolationMode.NearestNeighbor
g.SmoothingMode = Drawing2D.SmoothingMode.None
Dim rect As New Rectangle
rect.X = 0
rect.Y = 0
rect.Width = (bmp.Width * m_ZoomLevel)
rect.Height = (bmp.Height * m_ZoomLevel) 'attribute shows that destination rect is
the right size but not needed for test.
Dim attr As System.Drawing.Imaging.ImageAttributes
attr = New System.Drawing.Imaging.ImageAttributes()
attr.SetWrapMode(System.Drawing.Drawing2D.WrapMode.TileFlipXY)
g.DrawImage(bmp, rect,0, 0, 40, 40, GraphicsUnit.Pixel, attr)
attr.Dispose()End If
Catch ex As Exception
MessageBox.Show("ouch")
End Try
End Sub
This bug has been posted to Microsoft and confirmed by other programmers. A fix is to do the following:
Use (-0.5 + 0.5*srcw/dstw, -0.5 + 0.5*srch/dsth) as the source origin.
Happy Coding!
Jas
Tuesday, June 27, 2006
A buggy lesson

Two nights ago I was laying in my bed just about to fall asleep when I thought I heard a bug trying to fly in my ear. I jumped out of bed, turned the light on and couldn't find him. Finally I went back to bed after not finding the bug and just as I was approaching dreamland, I thought I heard the bug again. This happened several times during the night.
At some point, I started questioning my sanity. I thought maybe my brain was making up sounds that weren't there. Or, maybe my years of loud music had caught up with me and this was some sort of hearing damage.
(There is a coding point to this...) In the morning, I had two gigantic goose egg bites on my right arm. AHA! there was a bug.
At this point, I knew there was a bug and I had to find it. To make a long story short, two nights later and 6 bites total and I caught the bugger!
The moral of this story:
1. When writing programs never give up on a bug.
2. If you can't reproduce it or find evidence of the bug, don't let it drive you insane because it can. Take some time away from it and go back later. In time, you'll be able to isolate it.
3. Where there is one bug, there are usually two. Remember that unit testing can help but the test can only check logic that you coded for. Review your code change at another time you may spot others. (Yes, there were two mosquitos! I found one on the same wall 5 minutes later!!)
Happy Coding!!
Thursday, June 22, 2006
My Geometry Editor

I've been working on my own geometry editor now for about a year. Its written in C# vs.2005. I should be ready to push out a beta version of it in a few months. The image is one I did on the weekend.
Development has really slowed since my second son Bryce was born in February. I'm just starting to get some work done on it now. I've been working on the rotation gizmo for the last few days. I have it working pretty well now.
What I'm looking for are beta testers or hobbyists who would like to use it on a project. It will output .X files but I can create other outputs as well if needed. Please post a reply if you're interested and describe the project you would like to work on. Its okay for low poly objects but not so great for organic objects yet. It has pretty limited tools. I'll keep posting my progress as I go.
Subscribe to:
Posts (Atom)